

Are your sublimation prints turning into nightmares? You’re having faded prints, incomplete transfers, and ink blotches all over your items. After ruining multiple substrates, you’re giving up! Not knowing how to fix sublimation mistakes, it’s costing you a fortune.
Hold your pockets. You can fix these mistakes no matter what substrate you’re using. All you need to do is follow some steps strictly compatible with the mistake you’ve made. Read along and you’ll discover some of the easiest methods you can apply at home!
How To Fix Sublimation Mistakes?
To fix sublimation mistakes, you have to remove the old sublimation print first. Then, adjust the color profile in your printer and print the design on high-quality sublimation paper. Securely align the print, butcher paper, substrate, and heat press. Finally, maintain appropriate time, temperature, and pressure and cool the sublimation print fully.
5 Sublimation Mistakes on Tumblers & How to Fix Them
Most of the time, it’s a bad idea to throw a sublimated tumbler just because you made mistakes. Especially, it costs a lot when you’re working with a large batch of orders. It’s because it will increase your project time and operational costs in the long term.
However, if the design is cracking, peeling, or flaking, you can’t undo it. The same goes for having uneven print texture. In this case, you need to sublimate a new tumbler from the beginning.
Well, setting aside the irreparable mistakes, here are 5 sublimation tumblers mistakes you can actually fix.
1. Incomplete Transfer
One of the common sublimation mistakes on the tumbler is incomplete transfer. You’ll notice the images or designs don’t come out like the original. Some of the prints will be missing. The colors will look faded here and there. Overall, the tumbler will look clumsy and the work of an amateur.
Causes
Well, incomplete transfer can happen for many reasons. It could be heat press settings issues or simply using the wrong kind of sublimation supplies. Either way, it’s fixable only if you know what you’re doing wrong.
Incorrect Heat Press Settings
So, the first mistake here is to set wrong temperature in the heat press. If the heat is less than the required amount, the ink won’t vaporize and embed into the substrate.
Overheating also affects the substrate in the same way. Sometimes it’s not even your fault; your heat press can default and ruin the transfer rate.
Low-Quality Sublimation Ink and Paper
Well, the quality of sublimation ink and sublimation paper can also hamper the transfer process. If you use regular printer inks instead of sublimation inks, the colors won’t transfer. It’s also the same scenario with dye-based inks.
However, you need to use high-grade sublimation paper for the perfect transfer as well. Without the capacity to support the moisture of the inks, the paper won’t transfer the ink correctly.
Wrong Type of Sublimation Blanks
Finally, if you choose a sublimation blank with less than 80% polyester coating, the ink won’t transfer.
You need to ensure that the sublimation blank and the inks are also compatible with each other. If they are not compatible, the ink won’t transfer to the substrate at all.
Fix the Mistake
Here’s how to fix a sublimation mistake on a tumbler.
- Step 1: First, take a damp wipe and clean the heat process thoroughly. Make sure the heat press bed is free from any kind of dirt and dust.
- Step 2: Then, check the sublimation blank, paper, and ink manufacturer’s guidelines. Figure out the accurate time and temperature for sublimation.
- Step 3: Set the heat press with the required time, temperature, and pressure.
- Step 4: Now, when you place the tumbler in the heat press, put a butcher paper on top of the sublimation blank. It’ll help to distribute the heat evenly.
By maintaining all of these essential steps, you’ll be able to complete the ink transfer perfectly.
Preventing Future Mistake
You must take care of a few things if you want to get a fully covered sublimation print in the future. First of all, you have to use clean products. Every time you use the heat press, clean it. Throw away any sublimation paper and ink that’s past its expiry date.
You have to keep the heat distribution consistent throughout the whole surface. Make sure you’re using the right time, temperature, and pressure which is required by the manufacturer.
2. Image Distortion
Again, you can print distorted images on your sublimation substrate. The images don’t look well put and misaligned. When you can’t position the image correctly, the item looks unprofessionally sublimated. It’s a common mistake for newbie sublimation crafters but it’s fixable.
Causes
Well, often distorted sublimated images are a result of wrong printer settings. Before printing, you must check the alignment of the design in your printer. Most inkjet and sublimation printers allow adjusting the size, shape, and colors of the print. This helps to identify the accurate printing position and reduce any distortion mistakes.
In most cases, distorted images occur when you don’t mirror the images before printing. Like HTV and Iron-On printing methods, sublimation also requires mirroring.
However, the problem also appears when there are any wrinkles on the sublimation paper. If you press with curled or wrinkled paper on the tumbler, the design will also come out as it’s in a curled shape.
Incompatible sublimation ink and paper can also be the culprit for distorted designs. Factors like humidity, substrate color, and substrate material can mess up the image figure.
Now, even if you use high-quality sublimation blanks, inks, and papers, pressing with the wrong temperature will hamper the end design. So, you need to be careful about the pressure you’re putting in the heat press.
Fix the Mistake
If you want to straighten up your distorted sublimation image, here’s what you need to do-
- Step 1: First, you need to remove the sublimation ink from the tumbler. You can use a paint stripper to work faster and more efficiently.
- Step 2: Then, change the printer settings for the image. Apply appropriate dimensions for accurate placements. Most importantly, mirror the image before hitting “Print”.
- Step 3: Now, take a high-quality sublimation paper and print the design on the polymer-coated side. Make sure the sublimation paper is compatible with the printer, sublimation ink, and the tumbler’s material.
- Step 4: Then, preheat the tumbler heat press. At the same time, tape the printed sublimation paper around the tumbler blank. Put a butcher paper around the tumbler and place the item inside.
Note that you must use a new butcher paper that hasn’t been used for sublimation before. Otherwise, you’ll get streaks of old designs printed in your sublimated tumbler.
- Step 5: Finally, follow the manufacturer’s guidelines to determine the correct time, temperature, and pressure. After sublimation, cool down the item and reveal the design.
That’s it! You’ll get the designs correctly printed this time!
Preventing Future Mistake
To avoid image distortion issues, you must be cautious while sublimating tumblers. First of all, you have to check whether the image has proper dimensions or not. You must check the printer settings for this. Don’t forget to mirror the image.
Clean the printheads before printing as well. Otherwise, clogged printheads will produce distorted figures and unwanted streaks in your sublimation print.
Most importantly, you must remove any dirt, dust, or wrinkles from the substrate and sublimation paper. Be patient while placing the design on the sublimation blank. Also, by using compatible sublimation inks and papers, you’ll be able to create your desired sublimation prints correctly.
3. Fading Colors
Now, have you experienced faded sublimation images? It’s like you take out the substrate from the heat press and when you peel down the paper, the image isn’t vibrant at all.
Well, you can consider this sublimation mistake on 2 levels. If the sublimation print isn’t clear at all; if it’s absolutely washed out, it’s a beginner mistake. However, if the design is nicely printed but seems less vibrant, it’s a mistake for the professionals.
In both cases, you can fix the issue only after identifying the underlying causes. Hop on to the next segment to learn all the reasons that can result in faded sublimation prints on tumblers.
Causes
Starting with rookie mistakes, your sublimation tumbler is faded because you’re using regular paper instead of sublimation paper. The paper should also be compatible with the type of sublimation ink you’re using. Otherwise, you can have ink bleeding issues.
Again, if you use the wrong side of the sublimation paper, you will face the same problem. It also happens when you press the sublimation paper lighter than the required amount. You must apply the recommended time and temperature as well.
Moreover, you will face fading issues if you don’t consider the type of heat press. Using the same requirements for a convection oven for a heat press will mess up the print.
However, professionals can create faded prints due to the wrong ICC profile setup. Your printer will need a compatible Print Manager or Print Driver to correct all the colors for the preferred vibrancy.
Fix the Mistake
So, to fix faded images, you can go for two methods. The first one is removing the faded sublimation print and printing the image again. In the second method, you can skip the ink removal part and go ahead with sublimating the tumbler again.
Tools/Supplies
If you’re opting for the first method, you’ll need a high-quality paint stripper and a scraper. You won’t need anything additional if you choose the second method. Well, in case you’re more concerned about the color vibrancy, you can use a sublimation spray before placing the item in the heat press.
Now, you have to follow the exact steps below to fix faded colors in your sublimated tumbler.
- Step 1: First, apply paint stripper all over the sublimation designs and wait for at least 30 minutes. Then, scrape off the paint from the tumbler using a scraper. You can also use acetone, vinegar, or extreme heat to remove the sublimation ink entirely.
If you don’t want to remove the ink, you can start from Step 2.
- Step 2: So, next, you need to check the ICC profile. Adjust your printer color settings to get the most vibrant prints.
- Step 3: Then, you have to choose a sublimation paper that is compatible with your sublimation printer and ink type. Print on the polymer-coated side.
- Step 4: Before placing the transfer paper on the tumbler, you must clean the tumbler thoroughly. Use mild detergent to make it dust-free. Then, spray a decent amount of sublimation spray to cover the designated area.
- Step 5: Finally, check the recommended pressure for the substrate. Make sure you’re applying enough heat to embed the ink permanently to the tumbler.
Caution: Don’t overheat the heat press. Otherwise, you’ll end up with a brownish hue on your sublimated item.
Preventing Future Mistake
To prevent color fading issues in the future, you must double-check the heat press settings before printing. It’s best to determine the required temperature and pressure before sublimating a tumbler. You can use heat strips to check your heat press settings accurately.
Another way to prevent this error is to download the correct ICC profile before printing out the image. You must change the printer settings to achieve the highest output. It should be compatible with the type of sublimation paper and ink you’re using.
Don’t forget to keep the polymer-coated side of the sublimation paper towards the tumbler. This will help to adhere the ink properly into the substrate.
4. Blurred Text or Images
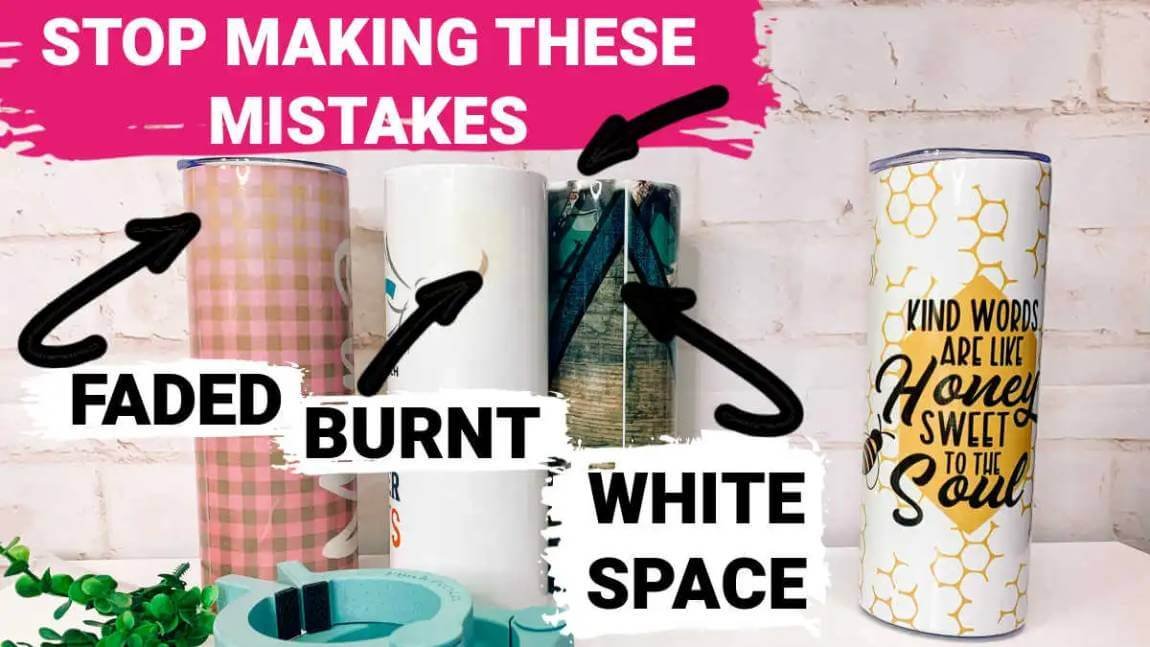
You might encounter blurry sublimation designs after sublimation. The printed design looks faded in some areas. Especially, it happens on the top and bottom edges. You’ll notice white shadows in some parts of the sublimated. It can happen with both texts and images.
This type of sublimation mistake is almost similar to faded sublimation issues. But it can happen due to some additional reasons apart from the reasons described in the previous segment. Move on to the next section to learn about the causes and fixes of blurry sublimation images.
Causes
The most prominent reason behind blurry sublimation images is insufficient heat. Without the appropriate amount of heat and pressure, the ink can’t embed into the substrate. It’s more common for crafters who don’t tape the sublimation print on all 4 sides of the tumbler.
Similarly, this problem occurs when the sublimated item is kept in the heat press for a long time. Due to excessive heat, the ink gets runny.
Images can also turn out blurry having too much moisture in the sublimation paper or the heat press. This mostly happens when you use Teflon paper instead of butcher paper on top of the substrate. It’s also a common problem when the image color profiles don’t match with the substrate properties.
Finally, clogged printheads are also responsible for creating faded images on the sublimation paper. So, when you sublimate that image, the image looks blurry on the substrate.
Fix the Mistake
Well, as for the fix, you can sublimate again on top of the sublimated design to fill in the blurry spots. But we won’t recommend doing it as the sublimated tumbler will lose its professional touch.
So, it’s best to scrape off the sublimation ink from the tumbler and redo the process correctly. Remember to spray adhesives after scraping the ink. It’s because the tumbler can lose its polymer coating while ripping the design.
Then, you need to follow the steps below to fix blurry sublimation problems once and for all.
Step 1: First, you need to wash the tumbler properly. Make sure there are no ink residues left.
Step 2: As the tumbler is ready to be nice and clean, you need to adjust the printer settings. Use appropriate color shades according to the substrate material. You must ensure the printed image is highly pigmented and has clear, vibrant colors throughout the design.
Step 3: After that, you have to stick the printed sublimation paper on the substrate. Make sure you’ve locked all the sides with heat-resistant tapes. For secure placement, you can drop 1-2 drops of water on the sides of the sublimation paper. This will minimize all the air gaps between the sublimation paper and the tumbler.
Step 4: Then, preheat the heat presses so that there’s no moisture. Wrap a butcher paper or crafts paper around the sublimation paper on the tumbler. Now, carefully place the whole package in the heat press. Tighten the knobs so that there’s no gap left in between.
Step 5: Finally, after applying the recommended heat and pressure take out the sublimation tumbler. Let it cool down and peel off the sublimation paper. This time, you’ll not receive any blurry prints.
Preventing Future Mistake
If you don’t want the same mistake to repeat in the future, you have to pay attention to your printer’s maintenance. When your printer functions well, it can create perfectly pixelated images ready to sublimate.
Moreover, you must adjust the CMYK color using ICC color profiles and other compatible print drivers. Always make sure the heat press and sublimation paper are moisture-free. Finally, avoid using Teflon papers for sublimating tumblers in the future.
5. Incorrect Sublimation Paper
Just like investing in a high-quality sublimation printer, you must invest in the correct type of sublimation paper too. Sublimation papers determine how well the ink transfer will be.
If you use the wrong type of sublimation paper, you’ll have a faded print after sublimation. The ink will not stick to the substrate properly. Sometimes you’ll also end up with ghosted prints on your sublimated tumbler.
Similarly, the ink can bleed from the paper creating blurry texts and images on the sublimation print. The designs will look distorted or you can even see unwanted shadows on the tumbler.
It’s an absolute beginner mistake that needs to be taken care of right at the beginning of your sublimation project.
Causes
The main reason your sublimation paper isn’t producing the desired output is incompatibility. It’s not enough to invest in a high-end sublimation paper. You must check whether it supports the ink and substrate material you’re using. You won’t get the desired output either if the sublimation paper doesn’t have enough moisture capacity.
Now, sometimes placing the sublimation paper incorrectly will produce faded designs. It happens when you place the print on the non-polymer-coated (off-white) side.
However, cheap sublimation papers can’t produce vibrant prints even if you use them the correct way. They don’t have enough polymer coating. So, they can’t transfer the ink fully to the substrate.
Again, you’ll get crooked designs when the sublimation paper isn’t set properly on the substrate. It also happens when the paper gets wrinkled while printing in the sublimation printer.
Fix the Mistake
To fix this mistake, you need to be careful about sublimation paper selection. But first, you need to remove all the sublimation ink from the tumbler. Only then you can re-sublimate with the correct sublimation paper.
So, here’s how you can choose and use a sublimation paper that is appropriate for your project.
Step 1: First, you need to determine what type of finish you want. Depending on your preference, you can choose a glossy or matte finish sublimation paper.
Step 2: Next, you have to check the manufacturing guidelines of your sublimation printer. Your printer should have the capacity to print on a glossy or matt paper depending on your preference. Make sure to check out the sublimation paper brands your printer supports.
Step 3: Then, you’ll have to check the sublimation ink quality of your sublimation ink. Is it water-based or oil-based? For water-based sublimation inks, you need to choose a heavy sublimation paper. On the contrary, if your ink has less moisture, you should choose a light sublimation paper.
Step 4: Now, ensure that the paper you have chosen has enough polymer coating. You can confirm it by checking if your sublimation ink supports the sublimation paper brand.
Step 5: After selecting the sublimation paper, place the paper in the printer’s tray. The whitest side should face toward the printer. You have to print the image on it. Remember that the whitest side always carries the polymer coating that you need for sublimation.
Step 6: Then, use heat-resistant tapes to secure the edges of the paper on the substrate. You must be aware of the correct position placement.
Step 7: Finally, press the tumbler with the recommended time, temperature, and pressure. Cool down the sublimated tumbler and you’ll get a gorgeous sublimation design.
Preventing Future Mistake
In order to avoid sublimation paper mistakes, you must be careful in choosing the correct type of sublimation paper. Here, compatibility matters. You have to match the sublimation paper’s properties with the printer, sublimation ink, and the desired output.
However, you must also be cautious about selecting a sublimation paper from renowned brands. For example, if you’re looking for heavy sublimation papers for 120 gsm or 125 gsm, the A Sub is the best brand for it. For low-moisture control, you can choose FU-A Sublimation Paper which works great for ceramic and metal substrates.
Again, Hiippo Sublimation Paper is more compatible with Hiippo sublimation inks than any other paper.
5 Sublimation Mistakes on Shirt & How to Fix Them
Making mistakes sublimating on shirts? Check out how to fix sublimation mistake on a shirt in the following sections.
1. Image Ghosting
Have you ever noticed a shadow of the image on top of the sublimation print? It’s called image ghosting. It looks like the design has blurred on the edges. You’ll see duplicates of the image but in a lighter shade than the original color.
It mostly happens with black sublimation inks. You can also notice it with dark, solid colors. In most cases, beginners have this issue while sublimating. It can be a challenging task for some advanced crafters to avoid image ghosting in silk or satin fabrics.
Causes
The main reason you have image ghosting issues is an inconsistent fabric. If the shirt moves along with the heat press or taping, the image will shift from its place. So, the heat press prints the image twice – before and after shifting. As a result, the first placement receives a light ghost-like print on top of the original print.
The same happens when you’re removing protective sheets from the substrate. Removing the parchment paper incorrectly can leave unwanted shadows around the sublimation print.
Again, if you constantly keep adjusting the heat press time and temperature, the shirt will receive ghosting prints. It happens when the time and temperature are not set correctly.
Now, it’s essential to cool the sublimation print after pressing it. If you peel the sublimation paper off the substrate without cooling down, you’ll face this image ghosting issue.
Expert crafters often make this mistake when they’re sublimating satin or any glossy shirts. The fabric of these shirts is extremely slippery. So, it’s hard to keep the fabric steady while sublimating. As a result, you have image ghosting issues.
Fix the Mistake
If you don’t want to throw away your sublimated shirt, remove the sublimation ink to solve ghosting issues. For light shadow spots, you can simply use rubbing alcohol or acetone and dab out the ink. However, if the mistake is severe, you need to soak the shirt in bleach or denatured alcohol to get rid of the design fully.
Note: Only washing the sublimated shirt will not remove ghosted images or the sublimation ink.
So, after removing the ink, you must follow the steps below to re-sublimate the shirt.
Step 1: First, place the cover sheet for your platen on a flat surface.
Step 2: Then, lay the shirt on top of the sheet. The side you’ll sublimate should be upward. Make sure there are no wrinkles on the shirt. You can iron the shirt or use a lint roller to avoid any wrinkles.
Step 3: Next, take the printed sublimation paper and place it on the shirt. You have to keep the printed side facing the surface.
Step 4: Now, you have to secure the corners of the paper with heat-resistant tape. Simply, cut small pieces of the tape and make it a loop. Remember not to place the tape on the edges.
Step 5: It’s time you place the butcher paper flat on the sublimation paper. The butcher paper should be the exact size of your heat press bed.
Step 6: Tape down the corners of the butcher paper as you did with the sublimation paper. You must put the tapes in the same position you’ve put it before. This will keep the heat press and the substrate in line. So, the prints will remain steady.
Step 7: Finally, press the heat press maintaining the correct time, temperature, and pressure. Wait a few minutes to let the print cool down. Then, peel off the paper and you’ll get fresh prints with no shadows!
Preventing Future Mistake
You can avoid ghosting mistakes by ensuring a secure placement of sublimation paper and substrate. Use heat-resistant tapes on the corners only. You can also use heat adhesives to make the print steady.
Also, don’t move the heat press too much while sublimating. Maintaining all these tips will help you to get clear sublimation prints every time.
2. Blurred Text and Images
During sublimating shirts, you can see hazy prints. The ink can look blotched and blurred texts seem unreadable. You may see the colors and designs overlapping each other. In worst cases, the ink will smudge and ruin the design overall. This is what a blurring issue looks like in a sublimated shirt.
Causes
You’ve already read the causes of blurry images in sublimated tumblers. Well, the reasons are all the same for sublimated shirts too.
Mostly, it happens when you have printed low-resolution sublimation print on the paper. Dirt and dust on the paper are also responsible in this case. More importantly, incorrect heat press pressure bleeds the sublimation inks and creates blurry designs.
Fix the Mistake
You have to follow the same procedure as described in fixing blurry images for tumbler sublimation. Make sure the shirt is clean and wrinkle-free.
Preventing Future Mistake
To prevent such a mistake, you must ensure proper heat press pressure. Always check the recommended pressure for your heat press model, sublimation paper, and the shirt you’re using.
Moreover, ensure a secure placement of the substrate and print on the heat press. You can follow the heat-resistant taping method described in the previous segment for the best results.
3. Incorrect Image Placement
Here’s another beginner sublimation mistake. If you place the image incorrectly, you’ll see the designs in the wrong design on your shirt.
The designs can also look tilted. It’s irritating especially if you have ADHD (Attention Deficit Hyperactivity Disorder) and OCD (Obsessive-compulsive disorder) issues. Not to mention how unprofessional it looks from a business aspect.
Moreover, incorrect image placements also cause image blurring and ghosted sublimation prints.
Causes
This problem occurs when you don’t attach the sublimation paper to the substrate properly. While opening and closing the lid of the heat press, the paper can slip. So, the image gets misaligned and printed unprofessionally.
It can also happen if you don’t check the print’s position placing the sublimation paper on the substrate. Sometimes beginners can’t measure the alignment properly. So, the sublimation print loses its professional accuracy.
Fix the Mistake
To fix the error, you have to re-sublimate the shirt. Get rid of the sublimation ink and prepare the shirt for sublimation. This time, you have to adjust the print settings and ensure the correct size of the print.
Then, follow the taping method you read in the previous section. Make sure the sublimation blank, paper, and butcher paper are aligned. You have to keep them in a sandwich position so that the paper doesn’t move while sublimating.
After finishing the sublimation process, you’ll see how professional your print is looking!
Preventing Future Mistake
Mastering the skill of correct image placement will help you to prevent this mistake. Practice on blanks before you move on to the actual substrate.
Along with image placement, you also have to master the art of placing butcher paper and the heat press settings. Don’t forget to use heat-resistance tapes and adhesive sprays to make the task easier for you.
4. Wrong Tshirt Substrate
Using the wrong type of t-shirt substrate can cost you bucks! You’ll have blurry and hazy images. The ink will start bleeding if it’s not compatible with the substrate.
In the worst case, the t-shirt won’t sublimate at all! Usually, it happens when fabrics like cotton don’t have a polymer coating on them. The print will wash away with the first wash.
Again, you can also face image alignment issues. Depending on the substrate it can become hard to stick the print to the shirt.
Causes
This type of mistake happens when you’re not aware of the substrate compatibility. Beginner sublimation crafters often tend to experiment with different kinds of t-shirts. So, they discover the unwanted patterns of sublimation prints.
It’s also possible when your t-shirt doesn’t have less than 30% polyester count. Though you can sublimate on 100% cotton, you need to use a sublimation spray before printing. Otherwise, the sublimation ink won’t adhere to the shirt.
Fix the Mistake
If you have blurry images, ghosting, banding, or incomplete transfer issues, you can follow the fixes described in the previous segment. But you must take extra care depending on the substrate you’re using.
For example, if you have a satin fabric, you have to use adhesive spray to secure the paper to the shirt. Don’t let the print move even slightly from its position.
Again, if you have cotton t-shirts, you must add a layer of polymer coating to the shirt. Most importantly, apply the correct temperature, and pressure for the required amount of time in the heat press. You can learn about it from the manufacturer guidelines of the sublimation blank.
Preventing Future Mistake
There’s nothing called the wrong t-shirt substrate if you know how to sublimate it. Make sure you choose a sublimation blank t-shirt to prevent this issue. You must ensure the correct polymer coating percentage, image placement, and heat press settings in this case.
5. Incorrect ICC Profiles
Have you ever experienced your shirt sublimation print not matching with the original print? It’s actually the result of using an incorrect ICC profile. Sometimes the sublimation looks too pale when you want a vibrant, glossy finish. Conversely, it can look vibrant when you’re trying to achieve a vintage outlook.
This type of sublimation mistake is more evident at the beginner level. Even some experts can find it difficult to sublimate 100% accurately with ICC profiles.
Causes
Your sublimation print doesn’t match the original colors because you’ve downloaded the wrong ICC profile. It’s possible that your print driver is not supporting the file extension. So, you can’t access the correct ICC profile.
Again, a lack of color-adjusting proficiency also leads to unwanted colors. It also depends on the color management software you’re using. If the software isn’t compatible with your print driver, it’ll ruin the print for you. Moreover, you can also misjudge the color gamut due to screen resolution.
Fix the Mistake
In this case, the fix entirely depends on managing your printer settings and color management software. But first, download the correct ICC profile from a reputable and authentic source. You’ll often find the ICC profile with the sublimation colors in a bundle deal.
Then, check the color gamuts and make sure they are the true colors you want to produce. Take the sublimation paper compatibility into consideration as well. If your sublimation paper doesn’t support the colors you’re trying to achieve, you won’t get the desired output.
Simultaneously, calibrate your computer and printer’s screen. The colors should show accurately in the shades you want. Edit the color profiles according to your taste. If you can maintain all of these steps, you’ll definitely nail the ICC profile next time!
Preventing Future Mistake
You have to be aware of the color differences your screen can show from the original shades. To avoid any issues with the ICC profile, you must buy the sublimation ink and paper cautiously. They must be compatible with each other. By following these tips, you’ll be able to prevent color reproduction issues in the future.
Other Common Sublimation Mistakes and Fixing Ways
1. Wrong Sublimation Printer
Choosing the wrong type of sublimation printer is the most basic sublimation mistake of all. The printer won’t be able to produce sublimation prints if it’s not compatible with the sublimation ink and paper.
So, you can fix it by purchasing sublimation inks and papers that’ll fit in the printer. You must keep the printheads clean always to prevent any kind of banding or image ghosting issues.
Moreover, you must adjust the color profiles to get accurate sublimation colors as in the original image.
2. Burnt Sublimation Prints
Now, sometimes you can end up with brownish, burnt sublimation prints. This type of mistake happens when you overheat the heat press. Leaving the substrate in the heat press longer than the required time causes burns as well. Defective substrates and dirty heat press platen can also be the culprit.
However, you can remove light burn marks from the prints using peroxide. The next time, you have to be careful about setting the time and temperature in the heat press. We recommend using a digital pyrometer to understand the true temperature of the heat press.
In case you find the substrate is the reason for burnt sublimation prints, you should try other garments. This will help you minimize the risk of ruining your prints again.
3. Low-Quality Sublimation Ink
Using low-quality sublimation ink can destroy your designs forever. It causes ink smudging, bleeding, ghosting, and incomplete prints. You won’t be able to achieve high color reproduction. Images will look flushed and unprofessional.
To fix this, you have to change the sublimation ink. Adjusting the color tones with color management software will also help in some cases. You should also use the correct ICC profile for better output.
However, you must change the sublimation ink compatible with the sublimation printer, paper, and substrate. It will help you to avoid problems in the future.
4. Overused Ink
If you use sublimation ink more than the required amount, it’ll ruin your print. It happens for a few reasons. First of all, the overused ink clogs the printhead. So, the printer cannot produce the desired print perfectly. At this time, you see ink banding issues.
Again, when you’re using too much ink, it will bleed through the paper. You’ll have ink blotching issues then. That’s why it’s necessary to check the recommended amount of ink for your printer.
You must be aware of the ink’s density and properties as well. You have to determine the ink levels depending on the design you’re creating. Also, regularly cleaning the printheads will help you avoid overused ink issues in the future.
5. Inaccurate Cutting And Positioning
Finally, inaccurate cutting and positioning can lead to unprofessional sublimation prints. This is a basic sublimation mistake which requires experience to get it done right.
However, the underlying reason here is the inability to set the size and dimensions digitally. If you can’t adjust the settings of your printer and creative software, you’ll have a wrong image size. Eventually, when you’ll print and place the image on the substrate, it won’t be precise.
So, to avoid this issue, first you have to ensure proper calibration of your printer first. Match the size of your substrate to your designs and try to visualize the end result. Be careful while you’re cutting and placing the design. Most importantly, you must secure the substrate on the heat press so that it doesn’t move from the original position.
How To Remove Sublimation Ink From The Tumbler?
You can remove sublimation ink from tumbler in 7 ways. It’s possible to renew your sublimation tumbler blank by applying heat, solvents, or simply using sandpaper. Here’s how you can do it.
- Place the tumbler in a convection oven and bake it for 1 hour at 350-400℉. The ink will gradually disappear and you’ll end with a blank tumbler.
- You can also use a heat gun to heat up the ink on the tumbler surface. Heat the area for at least 20-25 minutes. Then, scrape off all the ink using a scraper.
- For stainless steel tumblers, you have to soak the tumbler in vinegar for at least 45 minutes. Then, gently scrub the ink until it’s completely gone.
- Again, you can remove sublimation ink from a tumbler using ink stripper. Simply, apply the ink stripper all around the design and wrap with a foil. Keep it overnight and then, scrape off the ink with a scraper.
- If you have time, pour some water and scrub off the ink using a sandpaper. Keep going until the sublimation ink is completely gone.
- Rubbing solvents over the sublimation designs will also remove the sublimation ink from the tumbler.
- You can also overheat the print and remove it completely in a heat press. The ink will vaporize and you’ll get a fresh sublimation blank again. This is how to remove sublimation ink from tumbler with heat press.
How To Remove Sublimation Ink From The Shirt?
Now, if you’re sublimating shirts, you can follow the methods below to remove sublimation ink from the shirt.
- Soak ball of cotton pads in bleach and keep them on the sublimated area of the shirt. Leave them for at least 30 minutes. As soon as the sublimation ink starts cracking you can get rid off them using a clean sponge. Rinse and wash any excess dirt in the shirt.
- Using baking soda solution also does the trick. Place the solution in the sublimated area and let it soak for 30 minutes. Then, dabbing a damp cloth, you’ll be able to remove the ink entirely from the shirt.
- Denaturad alcohol is also efficient removing sublimation inks from shirts. You just need to follow the same steps as the baking soda method.
- Another easy way to remove sublimation is heating the shirt in a dryer. After the ink has melted, put the shirt in a washing machine and clean the ink completely.
FAQs
What Should I Do If My Sublimation Design Has Faded After Washing?
If your sublimation design has faded after washing, you should check the substrate and ink quality. You need to change the sublimation ink or switch to more polyester count material to prevent fading.
How To Fix Sublimation Mistakes On Other Surfaces?
Depending on the substrate and mistake type, the fix will differ for other substrates. If the sublimation mistake is as small as having small ghosting issues, you can fix it with a sublimation pen. But if it’s severe like incomplete transfer on a wooden surface, you need to adjust the heat press settings and resublimate it.
Can I Use Household Items To Help Lift Sublimation Ink Stains From Fabric?
Yes, you can use household items to help lift sublimation ink stains from fabric. Baking soda and vinegar work well in this case. But you have to make sure these items get at least 30 minutes to properly remove the stain from the fabric.
Final Words
So, finally, this is how to fix sublimation mistakes. It’s not a complicated task. You just have to maintain the correct procedures depending on the mistake you’ve made. Keep the substrate material as your first consideration since different kinds of substrates require different processes.
